

I’m making a procedural character generation system that uses shaders and mesh manipulation to generate diverse and unique characters.
Scope:
For the scope of my product, I would like to create a character creator similar to those found in popular RPGs like Fallout, Cyberpunk, and Skyrim. The product should be able to change character features like ear and eyebrow hight using simple to use sliders. This will be done with a mesh deformation system that should be able to resize, rotate and stretch the mesh of a character model. The product should also consist of a random character option that is able to use parts from a library of exiting character models (like those from Synty Studios). It should then be able randomize the stats from the mesh manipulator and apply those to the body parts and then combine those pats to turn the whole thing into a human looking character. The created models should still share the same art style and should not clash with each other. The program should be able to produce a wide variety of characters, each with unique features like, size, facial hair, and clothing styles. Shaders could also be used to introduce additional traits such as tattoos or scars, or to modify the textures and colors of body parts and clothing.
Phase 1: character creator research
- Project setup
- Character creators research
- Mesh deformation research
Phase 2: deformation and rotation
- Mesh deformation
- Mesh partial rotation
Phase 3: Put the character in character creator
- Set up library of character models
- Apply deformation system to body parts
Phase 4: Randomness and Shaders
- Make a generation system that takes all the made components and makes a deformed human mesh
- Make a texture/shader/material swap system for the character models.
Phase 5 Polish
- Make/Fix/crunch every problem that has not been fixed during the project.
Week 1: character creator research
Project setup
To realize my project, I decides to keep a Trello board and a roadmap to keep my progress organized.
First off, I needed to decide my scope as you can read above. I then made a roadmap of what tasks I want to complete each week. Finally, I put those tasks in a Trello board that I now can now use for the next five weeks.
The Trello link:
https://trello.com/b/ekvYUlmy/character-creator
Character creators research
There have been a couple of character creators that have been made with unity. Most of which are those creators that “just” swap body parts and shader textures. But there are praticly no examples with mesh deformation as i asume are used in the character creators of games like Saints row, Fallout, Cyberpunk etc… Here is one example of a tutorial from code monkey that uses the body swap method.
In a later week I would like to apply this kind of method. But I first want a way to deform the mesh of those body parts.
So, it seems like methods for character creation with mesh deformation are less common. I did found one creator example that actually manipulates facial aspects of a mesh, however this is done with additional software and not with unity mesh code.
So, it seems like I have to delve a bit deeper into mesh deformation and think of a way to apply this to specific parts of a mesh. This way I should be able to manipulate eyebrows, jawline, ears, and such.
Mesh deformation research
There is a more information to be found on mesh deformation. I took a couple of tutorials to play around with it. A lot of mouse-based ones so I could see how to deform specific parts of a mesh in real time.
This tutorial was particular nice to follow for it doesn’t just provide a nice example of mesh deformation. It also uses a radius to deform specific parts of a mesh. This could be useful to apply to specific facial features of character meshes.
Another great example is that from https://catlikecoding.com/unity/tutorials/mesh-deformation/. This example delves into the basics of mesh deformation. In this article mesh deformation is used to apply forces to vertices based on user input and using springs and damping to maintain the mesh’s shape while considering object transformations.
I also found a YouTube video that summarises the article.
Next Week
Next week I am going to apply both methods to a mesh to see if I can stretch, move, and maybe even fold it. I should be able to deform parts of a mesh and I would like to control the deformation with sliders.
Week 2: deformation
This week I aimed to create a mesh deformation system that I can apply to any section of a mesh so that I can deform specific parts like facial features of a human model.
I happen to find this handy tutorial: https://youtu.be/jED8nzQR8f4?si=TsCYtoZusguT-FWM
Here they explain a way to use the coloured vertices you draw in the vertex painter in blender as coordinates to use in a deform system.
You start with choosing a model and importing it in blender

You then go to the vertex painter and colour a section of the vertices you want to deform.
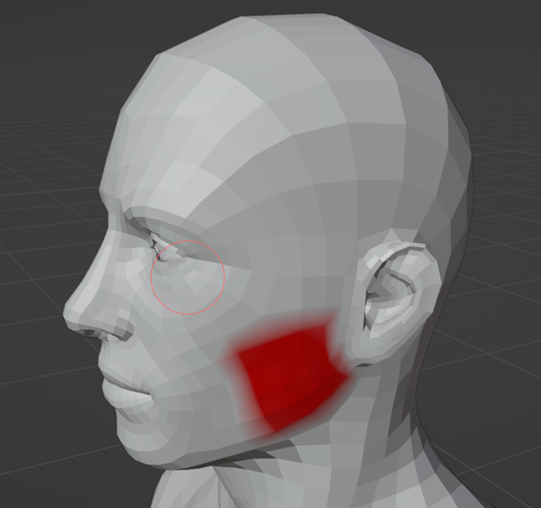
You can then export it back to Unity. And make the character creator script. In the script we first add the coloured mesh.
You can look at all the vertices in that mesh that are not their original colour, since we coloured the ones, we want to deform red earlier. Then we put those non-white vertices in a list that we can use later.
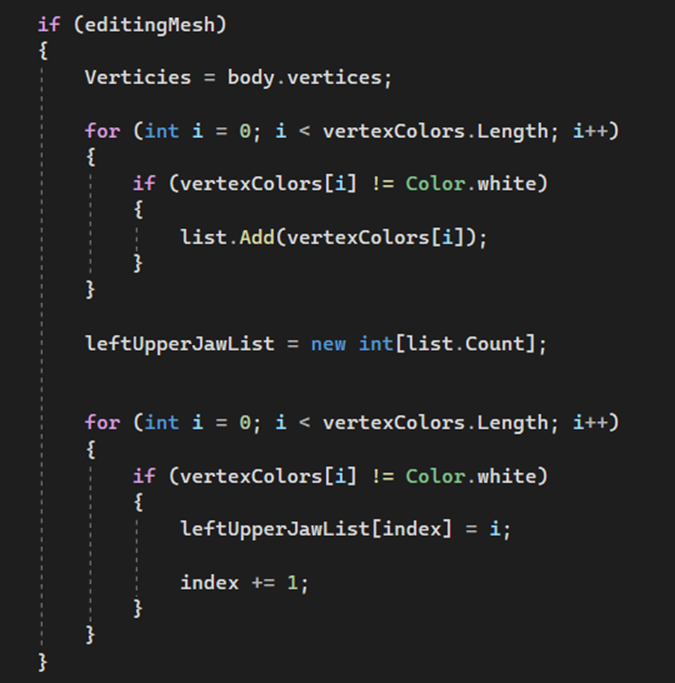
Then in another function we can take that list and apply deformation to those vertices using a value that we can control with a slider.

Finally we have to update the character’s mesh with the modified vertex data, so we create another function called UploadMeshData

It recreates the character’s mesh, sets the modified vertices, recalculates bounds and normals, optimizes the mesh, and uploads the data.
We call this function every time we deform the mesh.


This technique we can now apply to create more lists of different facial features.

For next week I’m going to apply this system to a small library of different body meshes so that those parts can be interchangeable in the final character creator.
Week 3: Bodies
Before I went looking for a library of body meshes, I needed to fix some issues with the code. Before the fix, I reset my mesh every time I used a different slider this wasn’t ideal for a character creator in which you want to adjust multiple physical attributes. So, I needed to make it so that it applies all the changes of all the sliders to the same mesh. I achieved this by making a copy of the body mesh and applying changes to that mesh.


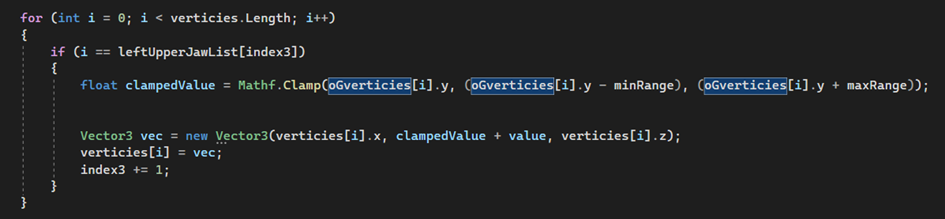
This created another problem. Because I keep adding the value when the slider is moved the vertices deformation went out of bounds.

To fix this problem I added a math clamp based on the original vertices of the body before it is deformed this way, I can limit the slider again.
(Actual) Phase 3: Put the character in character creator
So, I wanted to set up a library of character models that I can switch between to have multiple body types for a player to choose from. I went looking for asset packs but the I found the MakeHuman.

This program allowed me to make multiple bodies with different body types.

And another plus is that each body has the same number of vertices. This meant that instead of just switching between bodies, I could make a nice transition between body the meshes.
- Apply deformation system to body parts
Now before I add my character creator script to deform the faces of the bodies, I first have to make it, so bodies change with a sort morph transition.
After some research I found some info on blend shapes in unity and blender.
https://www.youtube.com/watch?v=ypRhJAfJXAc&ab_channel=Glauz
With this I can use the blendShapes in the skinnedmeshRenderer in unity to morph between two meshes.
To achieve this, I had to export my models to blender.

There you can simply select both and add the new shape to the shape keys of the original shape.
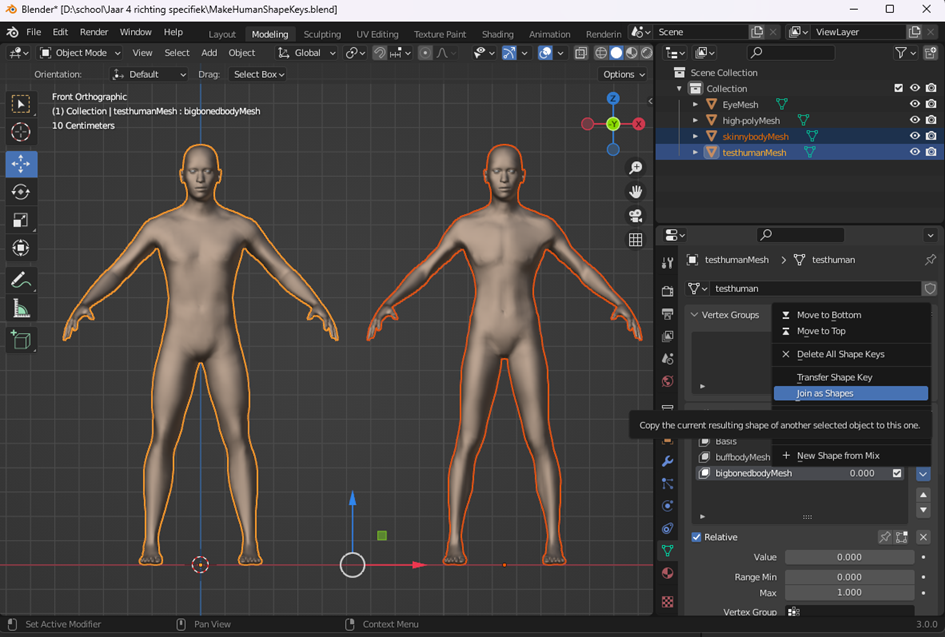
Now you have a value from 0 to 1 to which you can apply how much of the shape you want to apply.

Then you export the model back to unity. You can now see that the mesh renderer has been changed into a skinned mesh renderer and when you look in there you can see you blend shapes with slider. Now you can deform the deform the body into each shape you added. Just keep in mind that because of the multiple blendShaped you can overlay those and that doesn’t always look great.
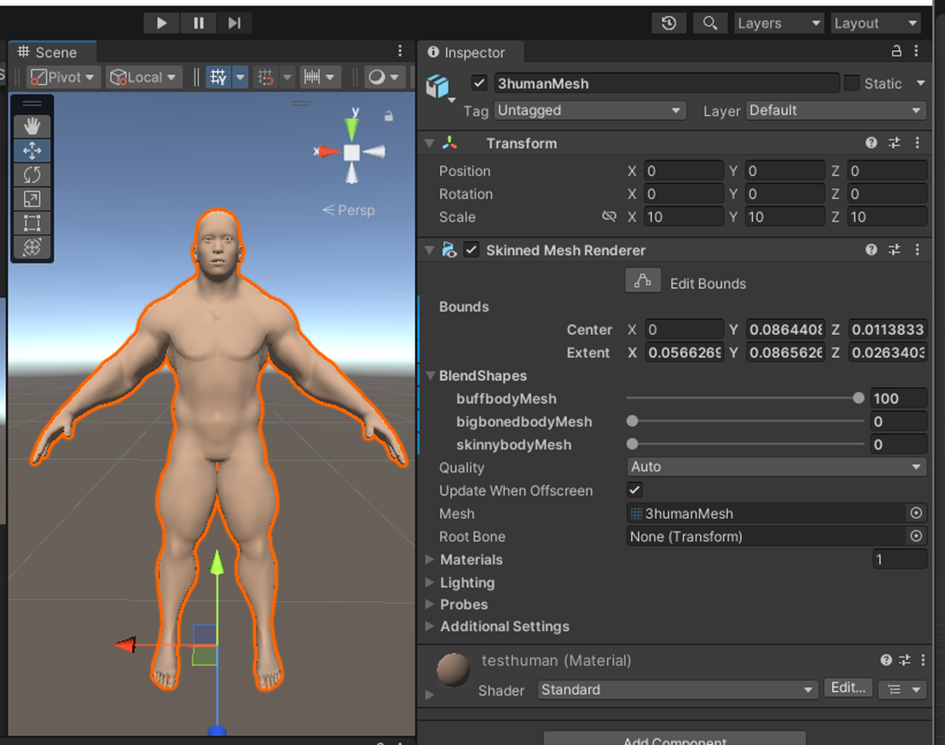
Next week I will create a script to handle the blendShapes and balance them in way so that the body will not look unatural. After that I will combine that system with the face deformation to create one character creator that handles both face and body.
Week 4: Ternary plot slider
This week I tried to make a triangular slider that I could use to balance the blendShapes from my skinned mesh renderer.
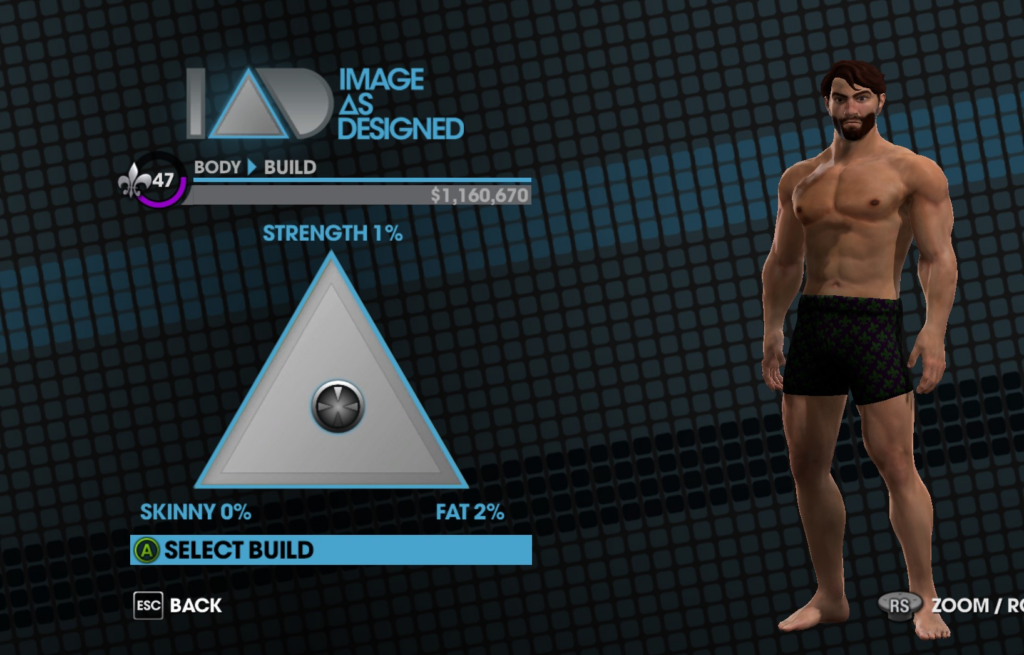
After some research I found that you can use Barycentric coordinates to represent points within a triangle. More specifically a ternary plot can be used to represent compositional data with three components.
https://en.wikipedia.org/wiki/Ternary_plot
To start I set up a triangle sprite in Unity and I placed an empty object in each corner to represent the position those corners.

I also put in a circle to represent my handle. The position of the handle within the triangle, should eventually balance the three values of the blendShapes.
With the help of ChatGPT I managed to create a script that can balance 3 values.
First, we add the corners and handle objects to represent each position. We also set up the floats of the characters attributes.

Now we have to calculate the position of the handle relative to the three vertices. To establishes a reference point (vertexA) and measures how far the handle is from this reference point in different directions (v0 and v1).

We then calculate some dot products to quantify the relationship between the vectors v0, v1, and v2. They provide information about the angles and lengths of these vectors.

After that we calculate the denominator using the dot products. This is used in the formulas for Barycentric coordinates (u, v, w). It’s crucial for determining the proportions of the handle’s position with respect to the triangle’s vertices.
Finally, we calculate the Barycentric coordinates (u, v, w) and we update the character attributes.
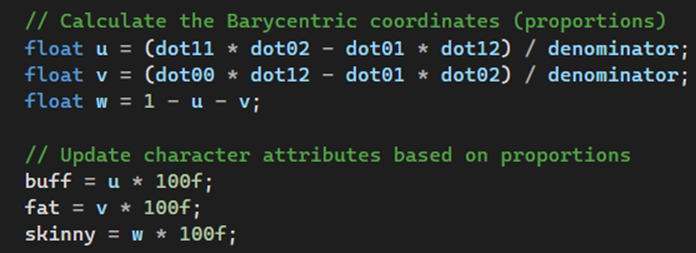
Barycentric coordinates represent how the handle’s position is distributed among the three triangle vertices. This is important because it allows you to determine which vertex has the most influence on the handle’s position. The Barycentric coordinates (u, v, w) are then used to adjust the character’s attributes. If u is high, it means the handle is closer to vertexB, so the character becomes more buff. If v is high, it’s closer to vertexC, making the character fatter. If w is high, it’s closer to vertexA, making the character skinnier.

Now all that’s left to do is to link our character attributes values to the actual skinnedMeshRenderer Blendshapes. That can be done by setting each blendshapeWeights to the right float.

Now when the handler is moved during runtime the body type gets adjusted.

Next week i will create a system that randomizes all set up components to create a randomized human body mesh with the push of a button.
Week 5: Randomness
This week it all needed it come together to finish the character creator. First, I cleaned up my my code by removing some unnecessary code from the Update function.

I actually replaced the update function with the OnDrag function to handle the movement and restrictions of the handle within my triangle slider. Now that the coordinates are clamped, the handle can’t get past the clamp and so it stays perfecly in the triangle.
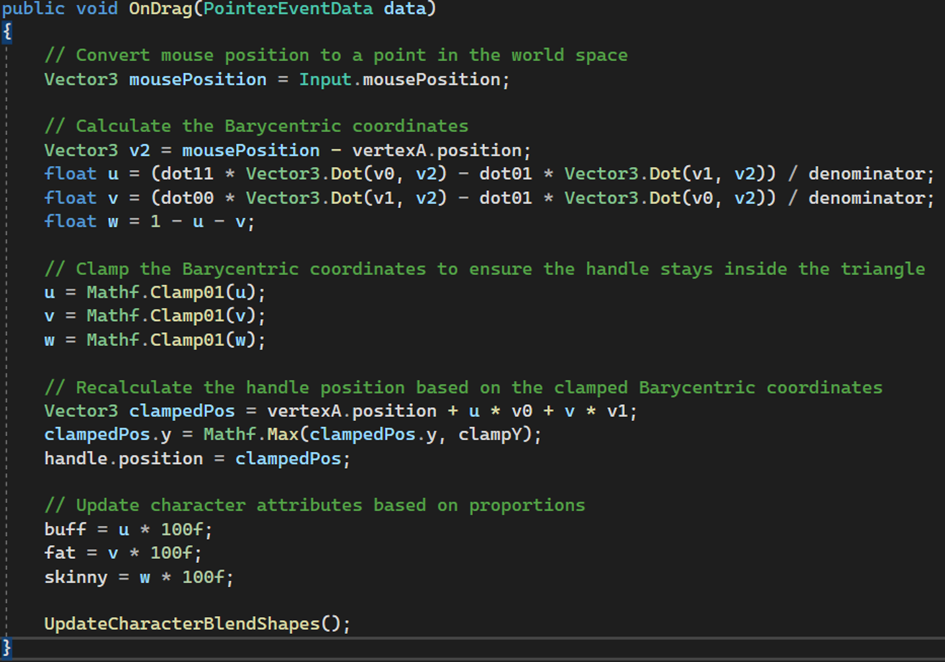
To move the handle it simply looks at the clamped coordinates during the drag and then sets the handle position to the clamped position of the barycentric coordinates.
Now I needed to add more facial features to my character creator because right now I only have three sliders. At this point I decided to switch to another deformation system. The same one I used for the body type switching. Using blendShapes. After trying both vertex colouring and blendShapes I found that it is much easier to add a new blendshape’s to an existing model then it is to colour vertices and to manually save them in Unity by hand. Transitions between blendShapes also look way cleaner then the blocky stretching of vertex colouring.
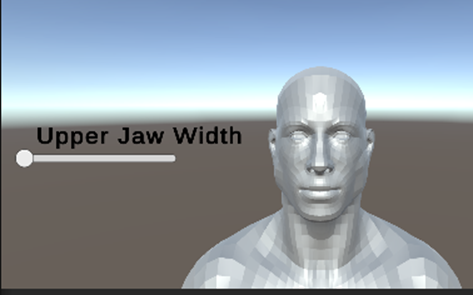

So I went back to make human and created a bunch of models with each a specific facial variation.

Then just as with the body I combined each new model with my base model in Blender to add the Blender Shape Keys.
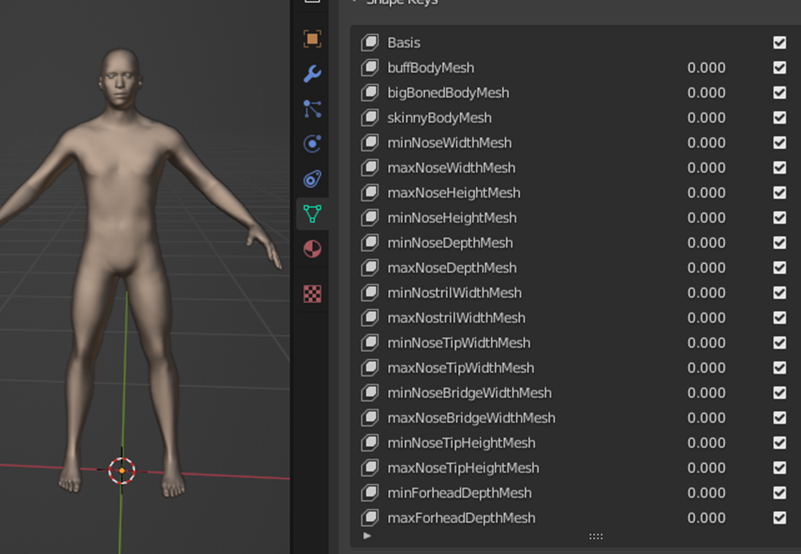
I then exported the model to Unity where the shape keys are automatically added as blendShaped to the Skinned mesh Renderer of the model. Now I have 80 total BlendShapes that I can deform.
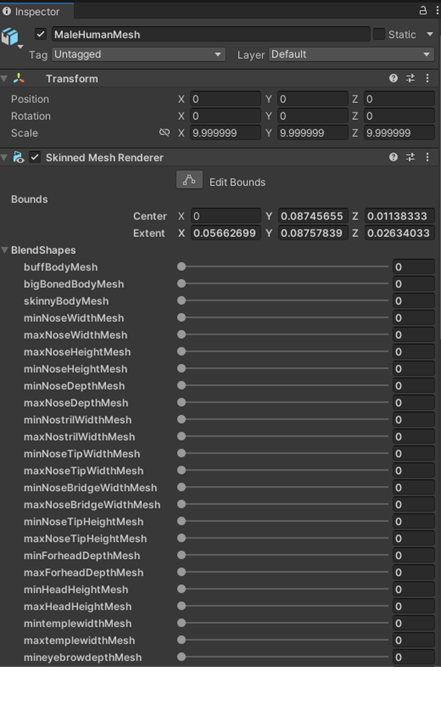
To handle the blendShapes we need some more sliders in the scene. Each slider will have a minimum value of -100 and a max value of 100. Each blend shape is either a slider for a minimum value or a maximum value. I made a system that switches between two blendShapes when you go below 0.

This function maps a slider value from -100 to 100 and transitions between two blend shapes (minBlendShapeIndex and maxBlendShapeIndex) based on the slider value. When the slider is at -100, it uses minBlendShapeIndex, and when it’s at 100, it uses maxBlendShapeIndex. When the slider is at 0, it smoothly transitions between the two blend shapes.

Now sliders can be moved to apply the blendshapes.
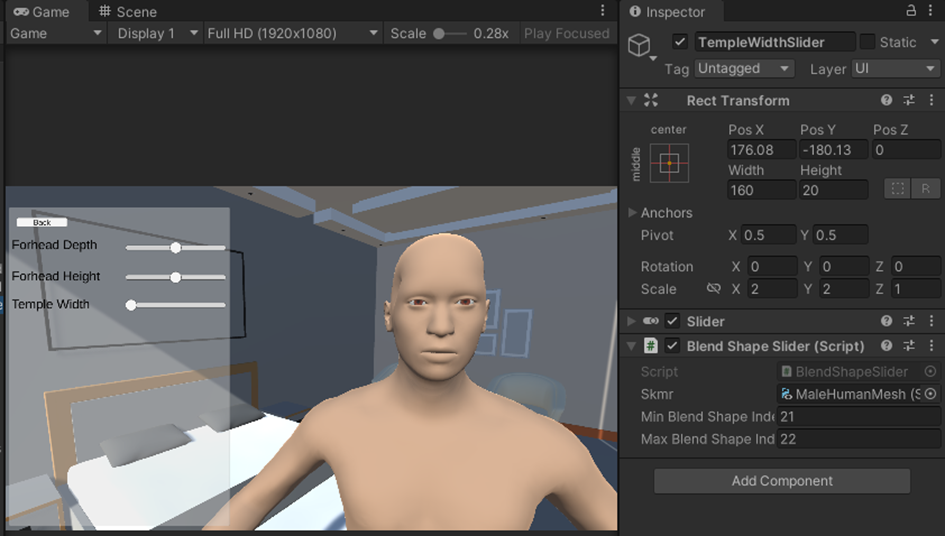
I now have quite the number of sliders. As with most charater creators the amount of slider can become overwelming. That’s why games like saint row 3 catogorieses groups of sliders. These can then be accesed trough a menu.

I needed to make a a UI menu to switch between all the sliders. So I made some groups and added some buttons in my scene.

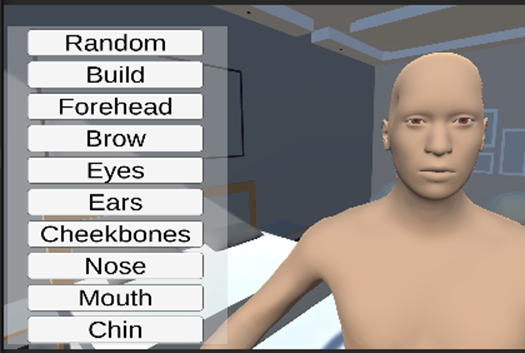
Now with a Ui manager I can switch between groups of sliders. When I click on one of the buttons in my menu it will set the slidergroup that is linked to the right index int, active.

I also added a small feature that let’s the camera switch between positions when you are either working on the face or the body type.
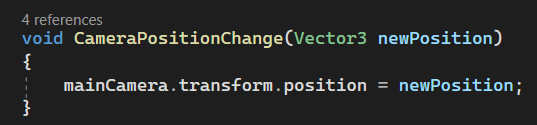
Finally I added a randomize function that loops trough all the sliders in the canvas and then randomises each slider value and It places the handle from the triangle slider in a random Y and x posiotion to generate unique randomly generated characters.

Here is a video of the final product:
Final Words
Overall, I’m quite happy with the final product. I can create humans with very distinct faces and even some variation in body types. I will definitely use it in the future when I get the chance. There are also some additional features that I would like to add if I had more time for this project, like a switch to a more feminine body type. Currently, it only has masculine body types. Another thing I’d like to add is extra meshes to the model, such as clothing or hair. During my research, I found some ways to combine skinned meshes, as shown in this video from Cutscene Artist:
Lastly, I’d like to add animations to the model to see what that would look like.
