

Goal
I want to be able to recreate the visuals from 2D anime and cartoons. In 3D animations and videdo games trying to emulate the style, the feeling can be a bit jarring and the illusion of it being illustrated can be broken. My goal is to come as close as possible to sell the illusion that my visuals are illustrated. By the end of the research term i want to understand the shading techniques i used for my project and want to be able to use them in for different purposes to strengthen my role as a designer withing the game development process.
research question:
How closely can you recreate the look from anime and cartoons to give the illusion that it’s illustrated in Godot 4?
Week 1
I started with little knowledge of shaders. To start off, i began my research by looking at existing tutorials for toonshading, I found a tutorial for Unity using their flavor of HLSL (High Level Shader Language) (1) by Erik Roystan that breaks up the process of their toon shader into different steps.
- Directional lighting
- Ambient light
- Specular reflection
- Rim lighting
- Shadows
I had trouble adapting their tutorial to Godot. In Unity HLSL, you can separate the shader process into multiple passes that will be executed sequentially. Due to Godot making use of their own flavor of GLSL (openGL Shading Language), I had trouble adapting the shading code to my own shader. One of the troubles was that inside of GLSL there is no pass keyword, making it harder to follow along the tutorial. Another part was that I had trouble understanding why certain steps were done in the way shown. In the upcoming week, I want to change my research strategy to be more focused in what I need to know and to get a better understanding of how and where to apply theory.
Week 2
This week my goal was to get back on track after struggling last week.
Lighting
for the lighting my objects, I made use of the Blinn-Phong lighting model. For this I followed along with David Lettier’s tutorial. One of the challenging aspects was that their tutorial was made with Panda3D, a game engine whose GLSL implementation differs a little from Godot’s.
Blinn-Phong is a lighting model extension of Phong that diffuses the light onto an object and creates a specular highlight based on the angle you are looking from.
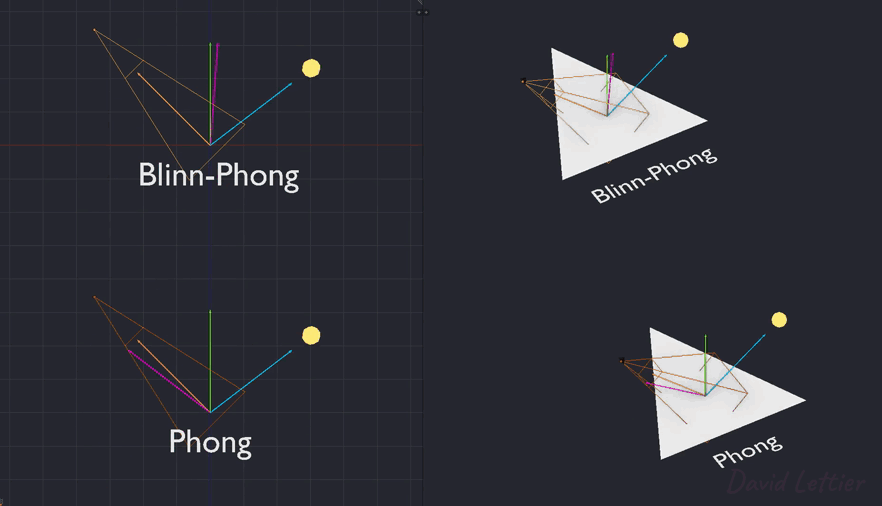
Instead of relying on a reflection vector we’re using a so called halfway vector that is a unit vector exactly halfway between the view direction and the light direction. The closer this halfway vector aligns with the surface’s normal vector, the higher the specular contribution.
https://learnopengl.com/Advanced-Lighting/Advanced-Lighting

In order to make use of blinn-phong in Godot, i had to hook into the light function of the shader, when the light pass happens, the engine will start executing it in order to apply all lights in the scene onto the object
I start by diffusing the light onto the the object, the intensity of the diffusion is based on the based on the dot product between the vertex normal and the direction light is traveling.
void light() {
	float NdotL = dot(NORMAL, LIGHT);

	// determine how strong the part should be diffused
	float diffuseIntensity = NdotL;
	diffuseIntensity = max(diffuseIntensity, 0.);

	vec3 diffuse = ALBEDO * LIGHT_COLOR * diffuseIntensity;

	// clamp diffuse to prevent emission
	diffuse = clamp(diffuse, 0.,1.);

	diffuse *= ATTENUATION;

	DIFFUSE_LIGHT += diffuse;
}
To add specular highlighting I need to calculate the gloss and apply it onto the object, I do this with the halfway vector.
void light() {
        vec3 halfway = normalize(VIEW + LIGHT);
	float NdotL = dot(NORMAL, LIGHT);

	// ...

	specularIntensity = pow(specularIntensity, gloss * gloss) * step(0.0000001, shininess);

	vec3 diffuse = ALBEDO * LIGHT_COLOR * diffuseIntensity;
	vec3 specular = LIGHT_COLOR * step(0.1, specularIntensity);

	// clamp diffuse and specular to prevent emission
	diffuse = clamp(diffuse, 0.,1.);
	specular = clamp(specular, 0.,1.);

	diffuse *= ATTENUATION;
	specular *= ATTENUATION;

	DIFFUSE_LIGHT += diffuse;
	SPECULAR_LIGHT += specular;
}
cel shading
cel shading/toon shading makes use of a non realistic light model to create the a feeling that an object is rendered similar to how cartoons and comics are illustrated. By using limited colors in a cell it highlights the contrast between tones on an object.
To add it onto my objects I need to alter the diffusion code, to create harder shadows, I make use of a step function to determine if the diffusion intensity should be interpreted as being lit or unlit.
void light() {
	// ...
	diffuseIntensity = max(diffuseIntensity,0.);

	// step diffuse intensity to get a banding effect);
	float litness = step(0.2, diffuseIntensity);
	diffuseIntensity *= litness;

        // ...
}
The step function will return either 0 or 1 based on if the diffuse intensity is higher than the minimum intensity I had set to determine if it is lit.
It is also possible to have multiple steps in order to have multiple bands. For this I make use of a curve texture, this curve texture can define multiple in order to create a variable mount of bands with a varying size.

The code to step the diffusion gets altered to read the curve texture, I also put it in a log2 function so that the lower values have a stronger effect.
void light() {
	// ...
	diffuseIntensity = max(diffuseIntensity,0.);

	// step diffuse intensity to get a banding effect);
	float litness = clamp(log2(1. + texture(diffuse_steps, vec2(diffuseIntensity, 0.)).r),0.,1.);
	diffuseIntensity *= litness;

        // ...
}
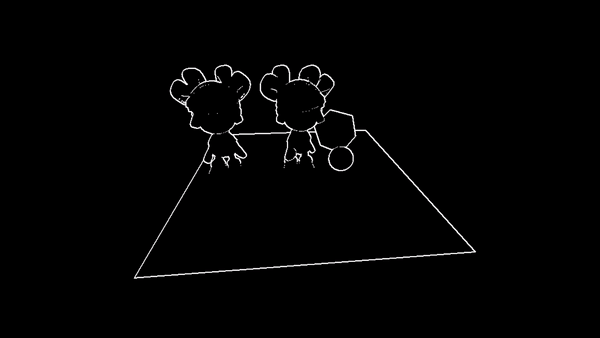
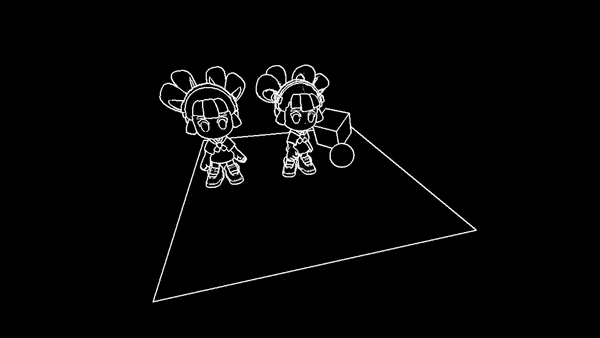
I added a character model with normal shading alongside an identical model that has my shader applied to it.

When comparing the two models side by side, I am most satisfied with how the hair came out, the contrast between the lit and unlit side work well with each other, the clothing however might need more tweaking in order to look better.
Outlines
In cartoon illustrations you usually have outlines around an object and it’s features. For now I make use of Vertex extrusion. I do this by creating a secondary shader that wextrudes the vertices alongside their normals in order to create a silhouette around the character. In order to make use of this shader I need to create a material inside next pass field of my original shader material. This will cause them to be executed one after the other.

This version of adding edges however is not perfect. On sharper and more detailed areas the effect can start to break down.

In order to improve the outlines I will have to research more advanced techniques, like using Sobels to sample edges. However, I ran out of time to properly reseach this.
Rim lighting
Rimlighting is fairly self explanatory, it lights an object around the rim, as if there is a light source behind it.
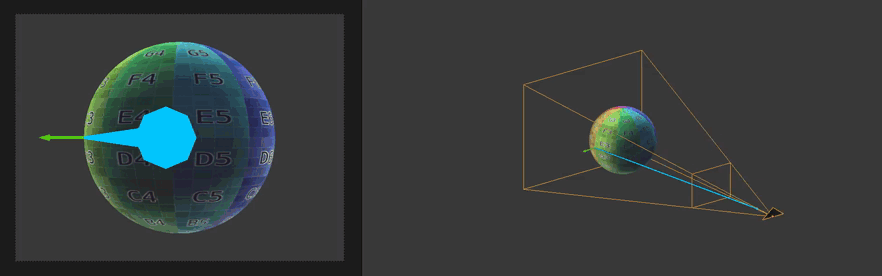
void light() {
        // ...

	// add rimlight based on where the camera is looking
	float rimLightIntensity = 1. - dot(VIEW,NORMAL);
	float inverteRimthreshold = 1. - rim_threshold;
	float invertedRimSpread = 1. - rim_spread;

	float rimLight = rimLightIntensity * pow(NdotL, invertedRimSpread);
	rimLight = step(inverteRimthreshold, rimLight) * rimLight;

	diffuse += rimLight;

	// ...
}
Week 2 conclusion
This week I felt like I made good progress with understanding how to create shaders in godot. There are still parts i need to learn in order to evolve my shader, such as sampling pixels and passing information around from shader to shader between passes. My goal for next week is to evolve my outline shader, which will require this.
Week 3
This week I wanted to improve on the outlining work I had so far. For this I looked into ways of doing edge detection within my scene.
This type of edge detection would rely on the complete screen picture and would be applied as a form of post process effect. In order to do that in godot i followed the official documentation on advanced post processing on the godot documentation website(8). I created a quad that will always encompasses the entire screen, on this quad i can do my post processing.
To start off i watched a video by 3brown1blue in order to learn about convolutions(10) followed by a video by computerphile on edge detection(7), in that video they made use of the sobel kernel over a grayscaled image in order to find edges in the image.
I wanted to see how this form of edge detection worked and how well it would look in my game scenario. I looked at different options for grayscaling my screen texture. I found a blog post(9) by John D. Cook about the options GIMP, an image editor, allows it’s user how to grayscale an image. It does so by three different metrics that can be chosen from:
- lightness
- average color
- luminosity
Lightness
In order to grayscale based on lightness, you would take the highest red, green or blue component and the lowest red, green or blue component of a fragment and take the average of the two.
// convert to grayscale by desaturating the colors
float rgbToGrayscaleDesaturation(vec3 rgb) {
	return (max(max(rgb.r,rgb.g),rgb.b) + min(min(rgb.r,rgb.g), rgb.b)) * 0.5;
}
Average color
To grayscale by the average color you take the average of the red, green and blue component of the fragment.
const float oneThird = 1. / 3.;
// convert to grayscale by averaging all colors
float rgbToGrayscaleAverage(vec3 rgb) {
	return (rgb.r + rgb.g + rgb.b) * oneThird;
}
luminosity (bt-601)
The luminosity method is a more sophisticated version of the average method. It also averages the values, but it forms a weighted average to account for human perception. We’re more sensitive to green than other colors, so green is weighted most heavily.
John D. Cook
bt-601 is a recommendation created by the ITU (International Television Union) in order to standardize how grayscaling would work on televisions supporting that standard. It creates a grayscaled image by taking a weighted average of the RGB components.
// convert to grayscale using NTSC conversion formula
float rgbToGrayscaleNTSC(vec3 rgb) {
	return rgb.r * 0.299 + rgb.g * 0.587 + rgb.b * 0.114;
}
luminosity (bt-709)
bt-709 is a newer recommendation by the ITU on grayscaling. Looking at the formula, it’s weight is significantly higher for the green component compared to bt-601
// convert to grayscale using ITU-R conversion formula (bt-709)
float rgbToGrayscaleITUR(vec3 rgb) {
	return rgb.r * 0.2126 + rgb.g * 0.7152 + rgb.b * 0.0722;
}
Using these grayscaled screen textures, i would then sample a fragment and it’s neighbors to create a convolution, the sum of multiplications of two sets, with the sobel kernels.
sobel kernel
The sobel kernels are two 3 by 3 kernels that get multiplied by the the samples from the frame in order to detect a difference on the horizontal and vertical axis.
#define HORIZONTAL_SOBEL_KERNEL { \
	-1., 0., 1., \
	-2., 0., 2., \
	-1., 0., 1.  \
}
#define VERTICAL_SOBEL_KERNEL { \
	-1., -2., -1., \
	0., 0., 0.,    \
	1., 2., 1.     \
}
After i create a convolution for both the horizontal and the vertical kernels, it calculates the horizontal and vertical direction of the edge, I filter out the small edges in order to find the more stronger edges.
float detectEdgeSobel(float[9] gray, float edgeTolerance, float minimumMagnitude) {
	float hConvolution = convolute3x3(gray, HORIZONTAL_SOBEL_KERNEL);
	float vConvolution = convolute3x3(gray, VERTICAL_SOBEL_KERNEL);

	// filter low convolution
	hConvolution *= step(edgeTolerance, abs(hConvolution));
	vConvolution *= step(edgeTolerance, abs(vConvolution));

	float magnitude = sqrt((hConvolution * hConvolution) + (vConvolution * vConvolution));

	// filter low magnitudes
	return  step(minimumMagnitude, magnitude);
}
After comparing the results of different grayscale functions passed through to the sobel convolution, I decided that bt-709 had the best all round results.


The edges look fairly well defined, however it has some flaws. the lines get created due to the difference in color, this causes an outline to appear on the face of the cel shaded character model, something that would look odd in a game. Another part that does not work well is outlining edges of objects that are in a shadow. As can be seen with the plane, the edge gets interrupted by the shadows of the objects. I was not able to figure out why the edge had vanished, as in the grayscale they are still easy to read out.
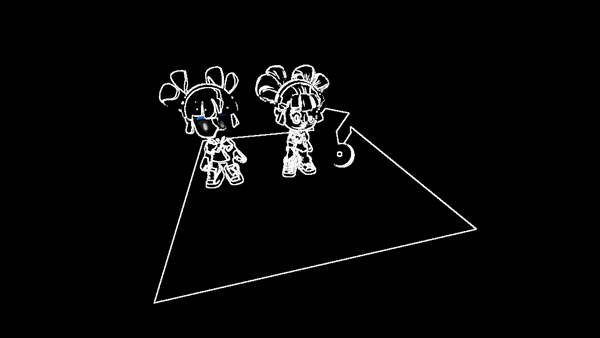
Instead of the screen texture, I wanted to try out using the normal buffer and the depth buffer for finding edges.
normal buffer
For edge detection using the normal buffer, it is similar to using edge detection directly on the screen texture. However, the normal normal buffer uses 3 different channels in order to determine the direction of a face. This means that i would either have to squash it into grayscale or work on each channel separately.


At first i tried detecting edges with grayscale, There seem to be a lot more lines already compared to edge detection with a screen image. But it still had issues with lines popping in and out depending on view angle.
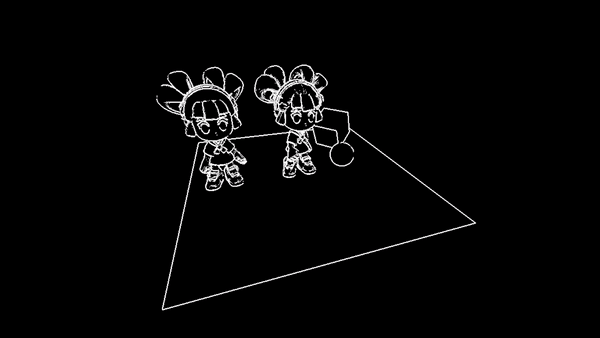
I then tried to calculate a convolution over each channel of the normal buffer in order to build lines for the edge detection. After i had the convolutions i added them together in order to combine the results of the three channels.


The lines look fairly good, however when two edges with the same normals overlap, the edge disappears.
depth buffer
I watched a tutorial by watt interactive(5) to understand how to make use of the depth texture in godot. Depth textures indicate how deep into the scene an object is, based on this i could create edges when this difference is large enough.

The edges created by the depth buffer create a nice looking outline, because it focuses on difference in depth, objects that are almost touching fade into a single outline, this can easily be spotted at the boots of the character models.
combining outputs
As a final test i decided to combine the edges created by the output of the normal buffer and the depth buffer. I hypothesized that they should be able to catch each other’s weak points and would give me a strong looking outline.
The edged seem to be a lot more defined when mixing the output of the depth buffer and normal buffer, they no longer fade into each other and it looks like it did a good job capturing the edges.
Now that i am satisfied with my edges, i want to apply them onto the screen, to do so i need to overlay them onto the original screen fragments. I also made it so that the outline can be any color i wanted.
uniform vec3 lineColor : source_color;
fragment() {
	// ...
	magnitude = clamp(magnitude, 0., 1.);

	vec3 line = lineColor * vec3(magnitude);

	ALBEDO = (step(0.001, magnitude) * line) + (step(0.001,1. - magnitude) * screenFragment.rgb);
}
I still wanted to add more to the edge shader in order to make it pop out more, like adding thicker outlines, however doing so would require me to do this over multiple passes in order to do it efficiently. While Godot can do multiple shader passes, the problem lies in passing information between the two passes. Currently, passes cannot talk with each other well, the next one in line simply draws over the previous pass. In engines like Unity, you would be able to pass a buffer of data between two different passes in order to get a stronger shader pipeline. Features like this have been proposed to the engine, but have not been implemented yet.
Week 3 conclusion
Overall i am satisfied with the edge shader i managed to make, i find that it really makes a difference in creating the toon aesthetic.
Week 4
This week i wanted to get to work on creating a shader that would allow me to have stylized shadows.
As a prerequisite, I had to go to my old toon shader and remove the attenuation from it. As this shader step would be responsible for shadows, having it apply the attenuation would be detrimental for the output. Finally, in the material with my toon shader i defined a new shader material for the next pass, this will draw over the existing shader and create the shadows.
I began with creating a mask to define what part will have a shadow applied to it. To do, i first had to define a mask for the shade created by my diffusion step and the built in attenuation. By combining them they mask over all areas that have even a bit of shadow.


While making the mask for my diffusion shadow mask, i noticed that the sphere had a spot on where the diffusion was at it’s strongest. After trial and error i found that the artifact originated from how I sampled my step texture. By clamping the high and low ends, I avoid it accidentally wrapping around while sampling.


uniform sampler2D stepsCurve : source_color;

void fragment() {
	ALBEDO = shadowColor;
}

void light() {
	float NdotL = dot(NORMAL, LIGHT);

	float diffuseIntensity = NdotL;
	diffuseIntensity = clamp(diffuseIntensity, 0., 1.);
	float stepper = texture(stepsCurve, vec2(clamp(diffuseIntensity, 0.01, 0.99), 0.)).r;
	diffuseIntensity = clamp(log2(1. + stepper),0.001,1.);
	float lightness = diffuseIntensity * ATTENUATION;
	float shadowness = 1. - lightness;

	float isShadow = step(0.01, shadowness);

	DIFFUSE_LIGHT = ALBEDO;

	ALPHA = isShadow;
Now that I have defined the area in which I want to have my shadows (marked as pure black in the mask screenshots), I can come up with a way to create a pattern for my shadows.
Before i decided on making a toon shader, I saw a video about mobius style drawing(12). It has a form of shadow hashing that i could use in my shader. It made use a colored texture and sampled the red, green and blue channels to come up with 3 different patterns for the shadows.
First i had to make sure that the textures would drawn witht the textures looking at the camera, to do so i had to make use of the inverse projection matrix, by multiplying the coordinates of the fragment. In order to avoid stretching, i scale the y component of my transformed projection by the aspert ratio.
varying vec4 fracCoord;

void fragment() {
	// ...
	fracCoord = FRAGCOORD;
}

void light() {
	float ratio = VIEWPORT_SIZE.x / VIEWPORT_SIZE.y;

	vec2 coord = (INV_PROJECTION_MATRIX * fracCoord).xy;
	coord.y *= ratio;

	coord /= VIEWPORT_SIZE.x;
	// ...
}
When i applied my hatched shadows to the mask, the shadows worked, but did not really give a distinguishing feeling of light and hard shadows.
While working on the shader, I overheard Alexander Mulder helping V about a different approach to the problem. Instead of using a single texture with 3 channels, I can use a gradient texture to create shadows of different sizes.
When i heard this, i thought about how i used a similar technique for making transitions between two scenes in the recess week. While i was trying to create transitions for a visual novel project i was working on on the side, i came across a forum post for making screen whipes in Love2d, one of the responses mentioned that I could also make use of a gradient texture to dictate the progression of the whipe.
When i realised this, i knew i could use my previous work of sampling a gradient texture for transitions to instead determine the size of my shadow. In Godot, i made a gradient texture where the black areas will be drawn earlier than the white areas of the gradient in area.

Inside of the areas with less shade, i want to have the pattern to be less pronounced.
void frag() {
	// ...
	float shadowScale = 1. - texture(shadowTexture, vec2(mix(0.0,0.5,shadowness), 0.5)).r;
	float shadow = 1. - texture(shadowTexture, coord).r;
	// ...
	ALPHA = isShadow * float(shadow <= min(shadowness, 0.9));
}
With the result it is visible that there is a clear distinction in intensity where the shadow isn’t as strong compared to when an area is has a shadow casted upon it.
Finally i decided to try out my shader in the context of a level. On the godot asset library i found a platformer project i could use as my scene.

The shadow hatching didn’t look as great on flat geometry. It’s either fully engulft in shadow or it’s not. I would have to try it out in other scenarios as well to see how it performs there.
Week 4 Conclusion
I was able to create a decent shadow hatching shader, but i feel like there is definetly room for improvement. One of the previous students tackled this as well and was able to get great results, with a shadow patern that does not get interupted and sized accordingly to how deep the shadow is. I might have to experiment more with expanding on the shader in order to get even better results.
Dictionary
- HLSL – High Level Shading Language, game engines can have a higher level abstraction of shading language to make it easier to program shaders. In the context of this article, I am mostly talking about Unity’s flavor of shading language.
- GLSL – openGL Shading Language, a common shading language that instructs the GPU how to process data from meshes and textures to create visuals.
- Blinn-Phong – a shading technique for lighting created by James F. Blinn to handle reflection and specular highlighting.
Sources
- https://roystan.net/articles/toon-shader/
- https://lettier.github.io/3d-game-shaders-for-beginners/index.html
- https://ameye.dev/notes/rendering-outlines/
- https://learnopengl.com/Advanced-Lighting/Advanced-Lighting
- https://www.youtube.com/watch?v=x1dIJdz8Uj8
- https://www.itu.int/dms_pubrec/itu-r/rec/bt/R-REC-BT.709-6-201506-I!!PDF-E.pdf page 4
- https://www.youtube.com/watch?v=uihBwtPIBxM
- https://docs.godotengine.org/en/stable/tutorials/shaders/advanced_postprocessing.html#full-screen-quad
- https://www.johndcook.com/blog/2009/08/24/algorithms-convert-color-grayscale/
- https://www.youtube.com/watch?v=KuXjwB4LzSA
- http://love2d.org/forums/viewtopic.php?t=89470
- https://youtu.be/jlKNOirh66E
Additional Credits
- Sophia character model – GDQuest