
Table of Content:
- Introduction
1.1 Goals
1.2 Motivation
1.3 Use-Case
1.4 Level-Design - Cave-Generation
2.1 Algorithm
2.1.1 Cellular Automata
2.1.2 Perlin Noise
2.1.3 Decison
2.2 Ore spawning
2.2.1 Single
2.2.2 Clumps
2.2.3 Veins
2.3 Mineable Blocks - Performance
3.1 Chunkbased Rendering
3.2 GPU-Instancing
3.3 Creating one Chunk-Mesh
3.4 Frustum-Culling - Last Tweaks
4.1 Fog
4.2 Shop
1. Introduction
Hi, my name is Jakob Ziener, im 22-year-old exchange student at the Amsterdam University of Applied Science (AUAS) following the Gameplay Engineering Minor. Back in Germany I’m studying Media and Computing at the Hochschule der Medien (HdM) in Stuttgart. For the R&D-Project I wanted to take a deeper look into procedural world generation and espacially into generating 3D-Voxel-Caves.
1.1 Goals
I aim to create a simple to use and flexible product where users can create Minecraft like caves that fit to their game. They should be able to add their own materials and ores that can be found inside of it. Also, you should be able to set the size.
1.2 Motivation
Procedural world generation is a way to give a game invinte different possibilities and endless spots to explore. It also gives a high Replayability to the game, because every map is different. I also want to use that R&D Project as a base for creating my own game.
1.3 Use-Case
The game is a mining game that immerses players in an underground world filled with hidden treasures and challenging obstacles. Players take on the role of a daring miner equipped with basic gear, and their goal is to explore deeper and deeper into the cave system, uncovering valuable ores and upgrading their equipment along the way.
- Starting the Adventure:
- The player begins the game as a novice miner equipped with basic tools.
- They enter the entrance of the cave and are immediately presented with the challenge of navigating through the dark and mysterious tunnels.
- Mining for Ores:
- Players can mine rocks and collect different types of ores like gold, silver, diamonds, and more.
- Each ore has its own rarity and value, encouraging players to strategize which ores to prioritize collecting.
- Upgrading Equipment:
- As players gather ores, they earn in-game currency, which can be used to upgrade their mining gear.
- Upgrades include better pickaxes, stronger lanterns, and lager backpacks, all of which enhance mining efficiency and allow access to deeper areas of the cave.
- Exploring New Regions:
- The cave is divided into multiple regions, each with its own unique challenges and ores.
- Players must upgrade their gear and skills to unlock and explore new regions.
- Deeper regions hold rarer and more valuable ores, providing a sense of progression and achievement.
1.4 Level-Design
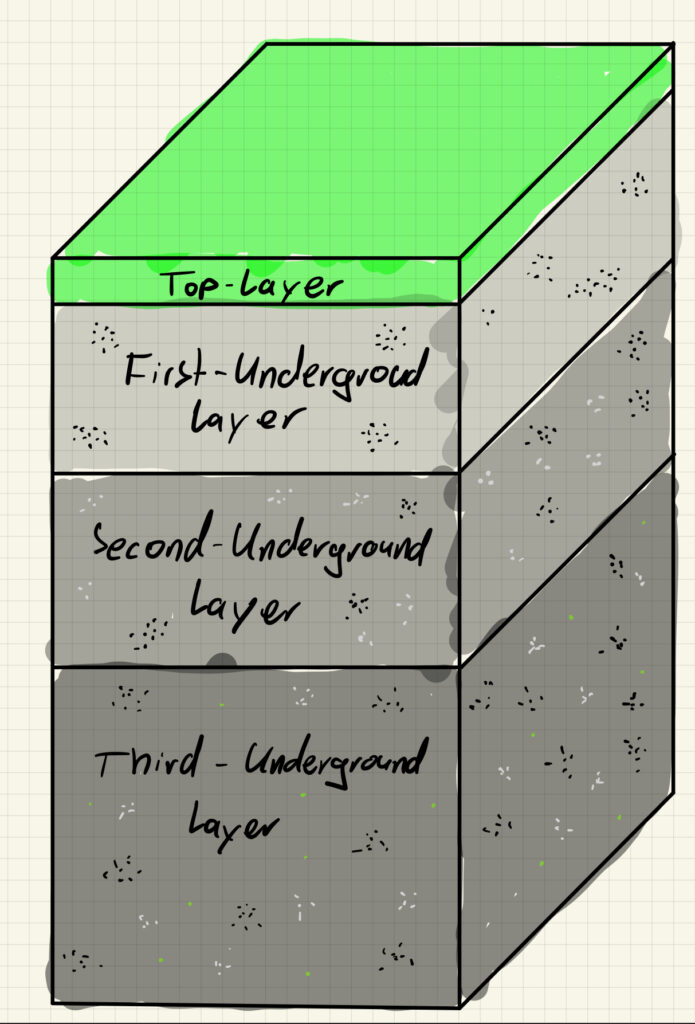
- Top-Layer
- Player Spawn
- Above the ground
- Made out of grass
- Player can upgrade his gear in this area
- First-Underground-Layer
- First exploration area for the player
- Made out of stone that can be mined by the player from the start
- Player can find low-value ores
- Second-Underground-Layer
- Next exploration area
- Made out of stone that can be mined with upgraded gear
- Player can find low-value and mid-value ores
- Third-Underground-Layer
- Deepest exploration area
- Made out of stone that can only be mined with high-upgraded gear
- Player can find low-value, mid-value and high-value ore
2. Cave-Generation
2.1 Algorithms
2.1.1 Cellular Automata [1]
A cellular automaton is a mathematical model consisting of a grid structure of cells that change in discrete time steps. The state changes of each cell depend on the states of its neighboring cells according to certain rules, which makes it possible to create a cave-like structure.


The Algorithm works like that:
1. Initalise an Array in the size you need and fill it random with 0 or 1 based on the “Fill Percentage”
2. Loop through every cell and count their “alive” Neighbour cells (Cells with the value 1)
3. Check if the cell value is a 0 or 1
3a. If the value is 1 -> Check if the “countAliveNeighbours” is smaller than “Death Limit” -> change to 0
3b. If the value is 0 -> Check if the “countAliveNeighbours” is greater than “Birth Limit” -> change to 1
4. Repeat from Step 2. for the amount of “Steps”

| Pros | Cons |
| Unique caves | Large maps look unnatural |
| Simple Implementation | Not deterministic |
| Small natural cave rooms |
2.1.2 Perlin Noise [2]
Perlin Noise is a mathematical function used to create natural and random-looking textures, patterns and movements in computer graphics and animations.


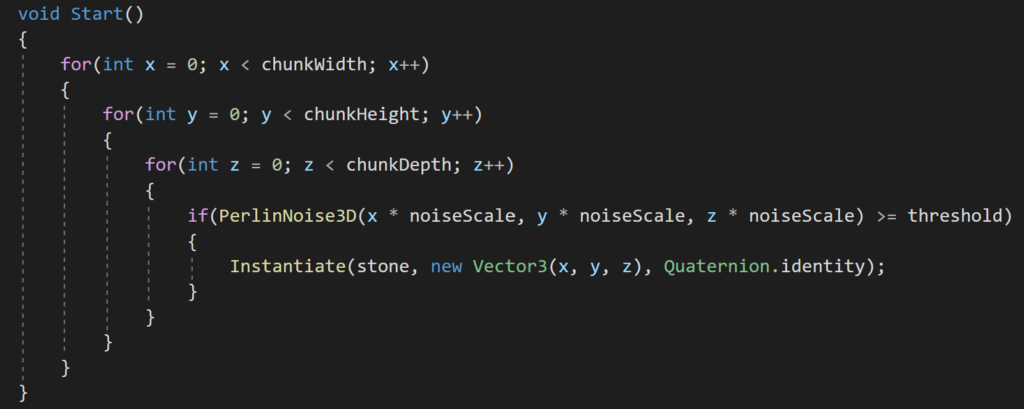
1. Loop through the size of the map
2. Check for every position in the map the Noise Value
2a. If the noise value is greater or equal the “threshold” -> Instantiate a stone at the position

| Pros | Cons |
| Unique caves | Lack of Realism |
| Simple Implementation | |
| Useful for large maps | |
| deterministic |
2.1.3 Decision
For my use-case, I want to create large cave-systems that are deterministic, so I choose the Perlin-Noise-Algorithm for my project
2.2 Ore spawning
Cave generation occurs when a chunk is initially generated. To accomplish this, I iterate through every coordinate within the chunk and determine the block placement based on the Perlin Noise values, as previously explained. In order to enhance the flexibility of cave generation, I’ve implemented the capability to incorporate various ores with distinct distribution patterns.
2.2.1 Single:

A simplest distribution type that is based on a spawn probabilty. So every time somewhere is stone, there is a probability that instead it spawns that ore.
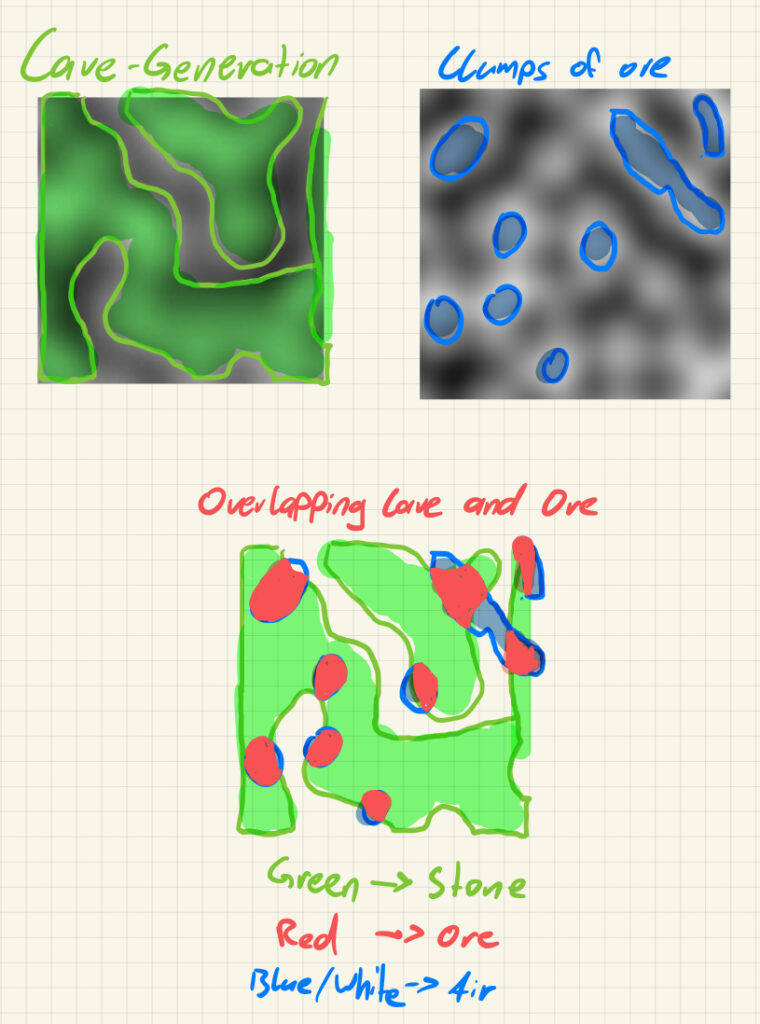
2.2.2 Clumps

Generates big clumps of an ore based on a second 3D-PerlinNoise layered with the 3D-PerlinNoise for the Cave-Generation.
2.2.3 Veins

To generate these type of ore-veins, I used a random-walk-algorithm with small modifications. So there is a certain probabilty, that a stone block is the start of an ore-vein. If it is the start, I generate a random length of the vein and a random direction. The direction is the modification, because if I there is no direction, there is a probability that it generates a clump of ore.
With a view added Ores the world looks like this:

2.3 Mineable Blocks
A very important aspect of the cave is, that you can dig through it and you can mine the different ores. To accomplish that, I added a “Highlightblock” that shows at which block the player is looking that is in reach.
The calculation of the position of the “Highlightblock” works like this:

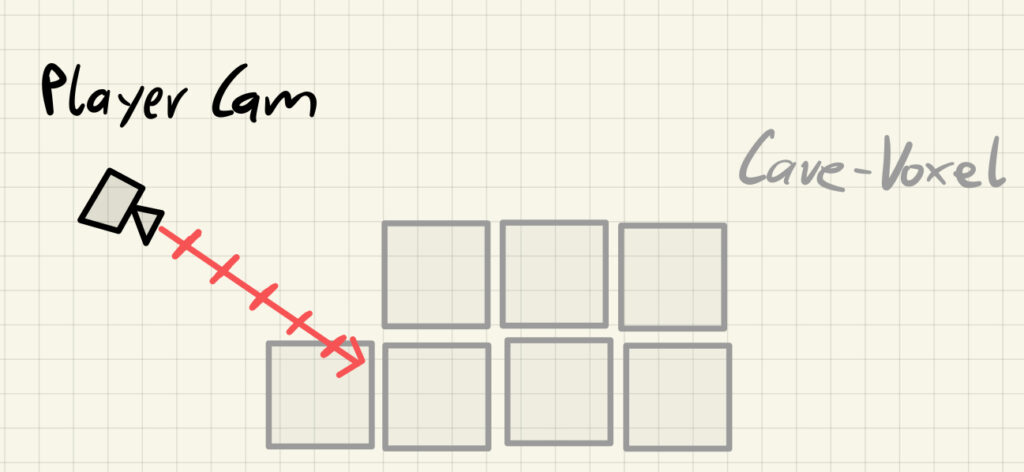
- Based on the “Player Cam”-position and it’s forward-vector, the code checks if there is a voxel infront of the player.
- If there is a voxel -> place the “Highlightblock” at the position and set it active
- If there is no voxel -> increment the step a little bit and check again
- If the step is out of reach for the character and no voxel found before, set the “Highlightblock” to inactive
So if the player wants to Mine a block, he press left-click and the block with the same position as the “Highlightblock” gets replaced by air.
3. Performance
The Performance goal of the Project is, to get constant 60 fps with the following specs:
- Prozessor Intel(R) Core(TM) i5-7300U CPU @ 2.60GHz 2.71 GHz
- Intel(R) HD Graphics 620
- Installierter RAM 8,00 GB
- Systemtyp 64-Bit-Betriebssystem, x64-basierter Prozessor
3.1 Chunkbased Rendering [3]
To make the caves useful for lagger maps I added chunk based rendering. It is possible to add a view distance, which is the amount of chunks that get rendered around the player. The map gets divided into grid, where every cell contains a chunk. So every chunk has a unique coordinate
1. First you get the Chunk-Coordinate where the player is in
2. Initalise a list “previouslyActiveChunk” which contains all “activeChunks”
3. Loop through every Chunk in view distance
3b. Check if the Chunk is in World (within the set world size)
3ba. If the chunk is in the world and not created -> “createNewChunk”
3bb. If the chunk is in the world and not active -> “set chunk to active”
3c. Remove active chunk from the “previouslyActiveChunk”-List
4. Set all chunks left in the “previouslyActiveChunks”-List to false
3.2 GPU Instancing [4]
The world I generate is all made out of the same mesh and many of them have the same material, so I use GPU instancing to improve the performance. GPU instancing is a graphics rendering technique used in computer graphics and game development to efficiently render multiple instances of the same object with minimal performance overhead. This technique is particularly beneficial when you need to render a large number of identical or similar objects, such as trees in a forest, rocks in a landscape, or buildings in a cityscape. You can see at the “Saved by batching”-attribute, that this is saving a lot, but the FPS are still low.

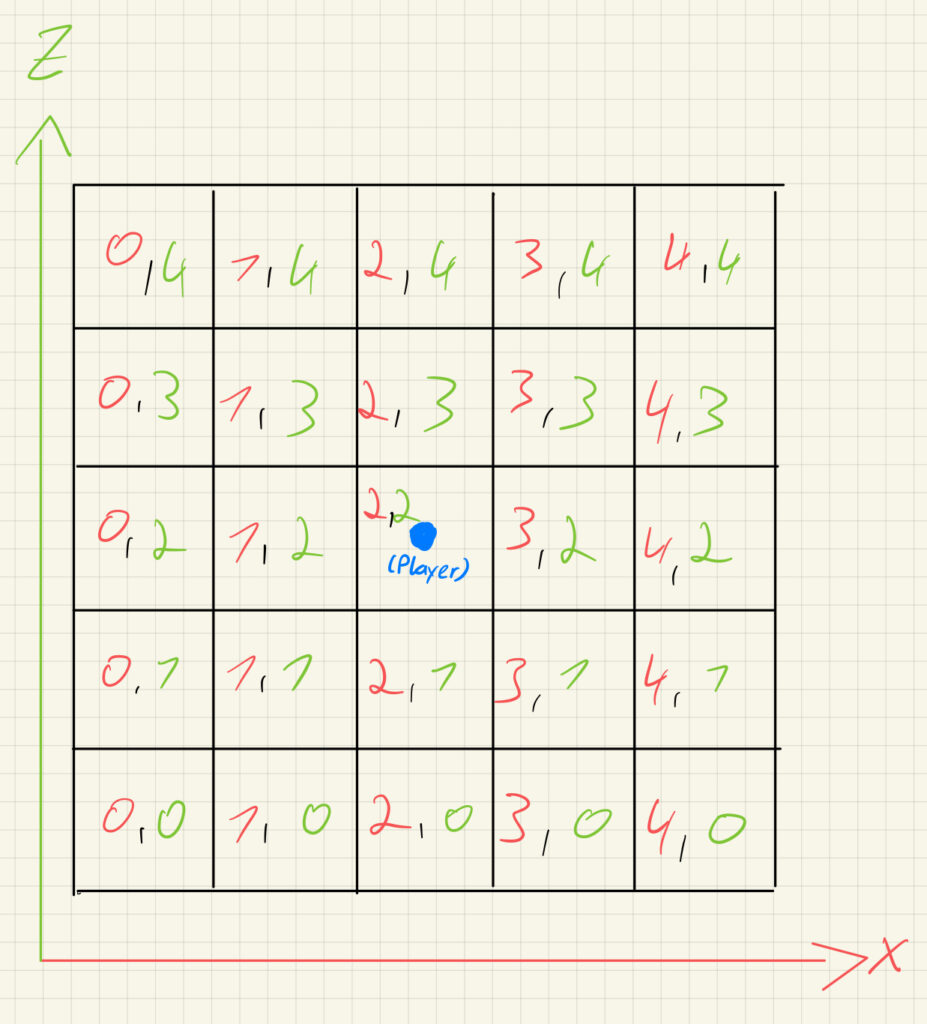
3.3 Creating one Chunk-Mesh [5]
Because the GPU-Instancing did not help that much I tried a different aproach by adding my own mesh generation. To create one Mesh for a chunk, I loop through the array, where the data of the chunk is saved. So if there is a block, the “AddVoxelDataToChunk”-Methode adds the block to the mesh:

The code loops through every face of the block and checks with the “checkVoxel”-Method if there is a block next to this face. If there is no block next to the face, the vertices the texture and the triangles get added to sperate lists.
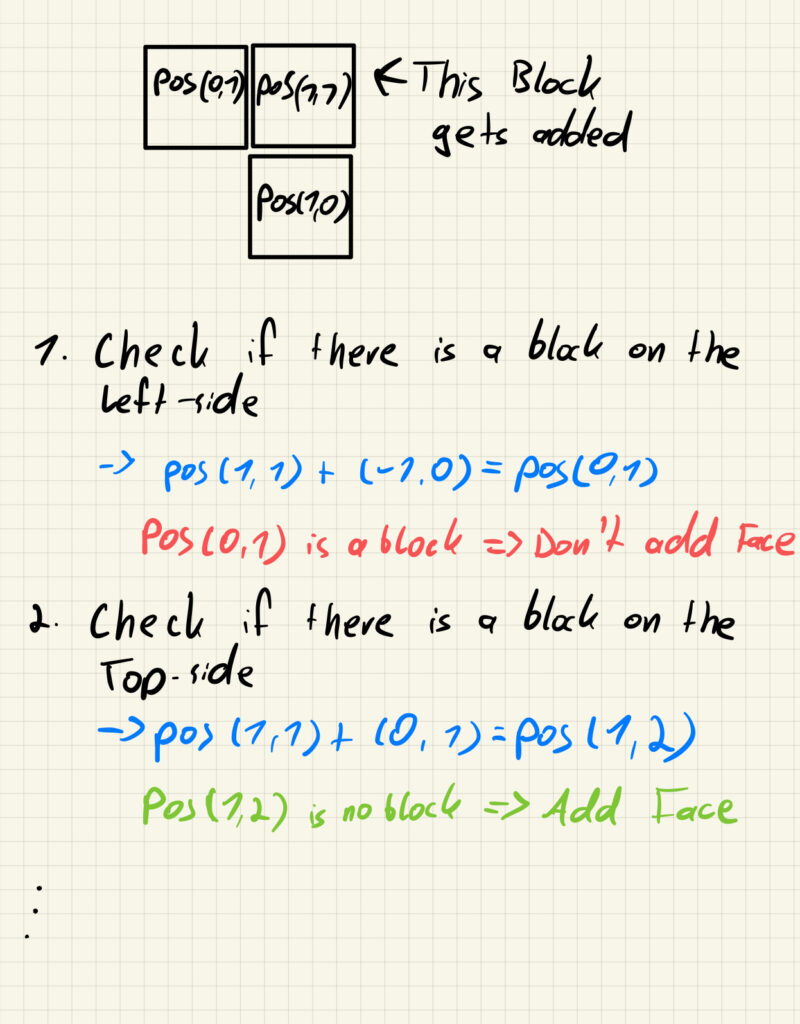
The list how to check in 3D:

To create the Vertices and Triangles, I added a list with all vertices positions of a cube (used as an offset that is added to the real position of the block) and a list with all triangles to create the different faces.

The “voxelTris”-array contains the index-number of the vertices, that are used for the face. Important is, that the “voxelTris”-array has the same order than the “checkFaces”-array.
By doing this, I come up to over 30 fps:

3.4 Frustum-Culling [6]
Frustum culling is a technique used in computer graphics and 3D rendering to improve the efficiency of rendering scenes by excluding objects or parts of objects that are not visible within the camera’s view frustum. The camera’s view frustum is a pyramid-shaped volume that represents the portion of the 3D world that is visible in the current view.
4. Last Tweaks
4.1 Fog
To add more atomosphere to the game I added fog around the player, so it gives more the vibe of a cave. It also helps, that the player can not see the new chunks that get generated

4.2 Shop
To add a goal for the game I added a shop-system, where you can sell your collected ore and buy upgrades for different things

Pickaxe: Upgrade gives you the possiblity to mine ores with a higher value
Backpack: Upgrade gives you the possibility to carry more ores
Tourch: Upgrade gives you the possiblity to see more around you
Sources
[1] Cellular Automata:
https://code.tutsplus.com/generate-random-cave-levels-using-cellular-automata–gamedev-9664t
[2] Perlin Noise:
https://adrianb.io/2014/08/09/perlinnoise.html
[3] Chunk Generation:
https://www.youtube.com/watch?v=ppFUTg_-Rbg&ab_channel=b3agz
[4] GPU Instancing:
https://www.youtube.com/watch?v=cwbyvbtJ9UY&ab_channel=KyleAndrews
[5] Creating a Mesh
https://catlikecoding.com/unity/tutorials/procedural-meshes/creating-a-mesh/
[6] Frustum-Culling
https://docs.unity3d.com/ScriptReference/GeometryUtility.TestPlanesAABB.html